
Get hassle-free AAV titer and empty/full characterization on Stunner
In this mini-webinar and accompanying article, Kevin Lance, PhD, Marketing Manager at Unchained Labs, shares how to obtain AAV titer and empty/full characterization quickly and efficiently with only a small amount of sample required.
AAV characterization requires multiple techniques
Kevin began the webinar by discussing the complexity of AAV characterization. Proper characterization requires the answers to several questions including: how much protein is present, how much DNA is present, are things intact, are they the right size and is there any aggregation. As a result, AAV characterization can’t be completed using just one method and thus several techniques must be combined to provide a full picture. In addition, the use of multiple methods and the sample volume required for most methods requires large sample volumes to complete AAV characterization work. In Figure 1, you can see a variety of characterization requirements for AAV. Stunner’s characterization solutions are represented in green: providing capsid titer, empty/full ratio, and aggregation information in one report, in under one minute per sample.

Two common techniques, Dynamic Light Scattering (DLS) and UV/Vis absorbance each tell a part of the AAV story. DLS is capable of providing capsid titer and aggregate information, but can’t provide information about DNA. UV/Vis is able to quantify total protein, DNA, and empty vs. full ratios, but it can’t provide any particle information about what is contained in the capsid.
Stunner makes characterization more efficient
Next, Kevin described the increase in characterization efficiency that can be gained by using Stunner. Stunner combines DLS and UV/Vis to provide a more complete characterization picture, in less time (under one minute per sample), and with only 2 µL of sample required. Prep work is also significantly reduced with no labels, reagents or standards required.
How does Stunner work?
The operation of Stunner couldn’t be simpler, as Kevin explained, 2 µL of AAV sample above a titer of 1012 is deposited into the input well. From there, the liquid is pulled into the microfluidic reservoir. At this step, the sample can sit for up to two hours before reading, without any concern about evaporation. After the plate is loaded into the instrument, the circuit is read when empty, this removes any absorbance issue from the plastic. Then, a pump applies a small vacuum that moves the sample into microcuvettes to be read. Because the circuit has fixed pathlengths, it can make very precise and accurate reads.
Two techniques are used to read each sample, UV/Vis for concentration and DLS for sizing. SLS intensity data can also be read. The Stunner AAV Quant application then pulls the data together to give a full picture of the AAV sample (Figure 2).

Kevin then provided data to show how Stunner gives you the complete picture and the data that can be generated with Stunner (Figure 3).

How Stunner compares with other methods
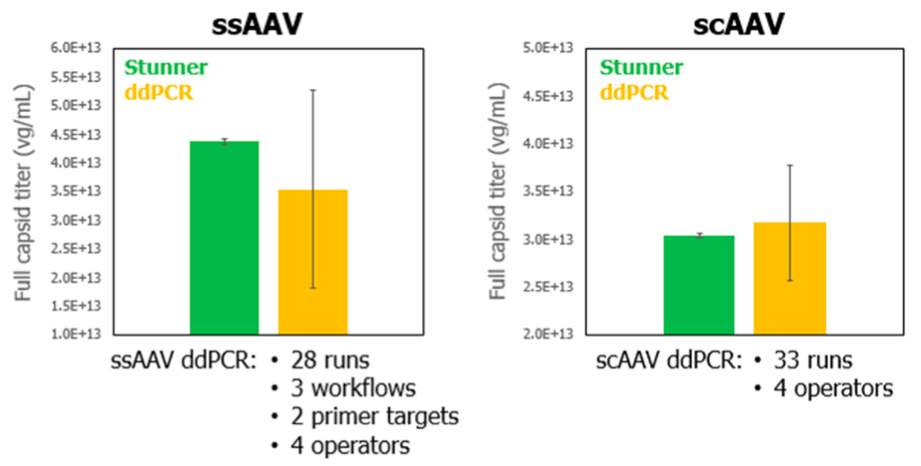
Next Kevin shared data from a collaboration with StrideBio. In the collaboration, genome titer was evaluated for two types of AAV – single stranded (ssAAV) and self complementary (scAAV). The results using ddPCR were compared with results from Stunner.
For ddPCR, a robust variety of experiments with varying parameters were used to accurately calculate titer, which also resulted in the large error bars present (Figure 4). Stunner achieved similar genome titer results, with better precision being the result of only using a single experiment of triplicate samples. For both ssAAV and scAAV, results compared very favorably, however the time required for ddPCR is significantly higher than for Stunner.
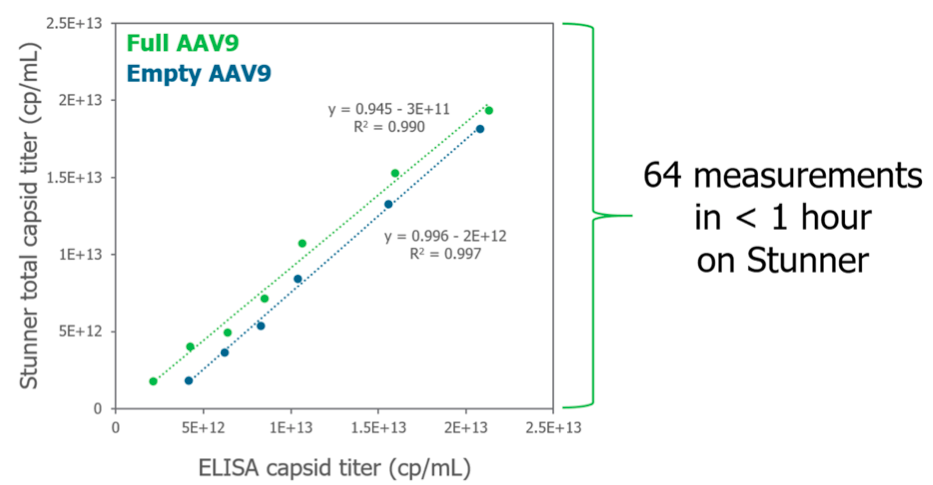
In another comparison, total capsid titer was calculated using Stunner vs. ELISA methods. While results from both methods were similar with a slope close to 1 and R² values above 0.99 (Figure 5), the amount of time required for ELISA methods were much greater. While these data required hours of hands on work using ELISA, Stunner was able to run 64 measurements in less than an hour and because no sample prep was required, there was just 5-10 minutes of hands on work.
Another collaboration with StrideBio examined how Stunner’s quantification of the percentage of full capsids compared with Analytical Ultracentrifugation (AUC) for a highly purified sample. AUC was read for the highest enriched percent full sample and dilutions with empty capsids were used to create target percent full. The results correlated well and were highly linear demonstrated by a high R² value. However, AUC required orders of magnitude more sample and significantly longer processing time than the 45 seconds required for a single run on the Stunner.
Using Stunner to inform your process
Kevin then discussed how Stunner can be used to inform the AAV production process. Beginning with AAV lot 1, Stunner identified lots of aggregation in the sample.The full data readout that Stunner provides also identified the presence of additional protein and DNA that was not part of a capsid. UV/Vis alone would have only showed the total amounts, but by combining with DLS data, the amount of excess protein and DNA could be measured. In contrast, a second lot was examined and the DLS showed low aggregation. When all data was combined, it confirmed that there was very little free and aggregated protein or DNA.
Kevin went on to describe another experiment that evaluated Stunner’s ability to quantify AAV empty/full ratios. They took a mixture of full and empty AAV stocks for AAV9 and mixed them at different ratios. Stunner results aligned well with expected results based on dilution used. Stunner works well with any serotype, after being provided with basic serotype details.
Another advantage for Stunner is iodixanol quantification. When using iodixanol it is important to identify how much is in the sample and to check on quantification after each buffer exchange. Stunner is able to detect iodixanol as low as 0.0005% by volume.
Summary
In summary, Stunner is able to compile data using UV/Vis, DLS, and SLS techniques in just one run to provide a highly efficient and accurate method for AAV characterization. Stunner provides the full story of your AAV with complete data on sample aggregation, AAV full and empty capsid titer and empty/full ratios using just 2 µL of sample volume.
For more information, please click below to view the full live demo and to learn more about Stunner.
About the Presenter
 Kevin Lance is the Marketing Manager covering the global Analytical Instrument portfolio at Unchained Labs. Prior to Unchained Labs, his research experience covered the fields of sustained antibody delivery and nanotechnology. He earned his Ph.D. in Bioengineering from the joint UC Berkeley – UCSF Bioengineering Graduate Program.